corrscope
Corrscope Help
Homepage at https://github.com/corrscope/corrscope. Report bugs at https://github.com/corrscope/corrscope/issues/ or https://discord.gg/CCJZCjc.
Corrscope is named because it cross-correlates the input wave and a history buffer, to maximize wave alignment between frames.
Tutorial
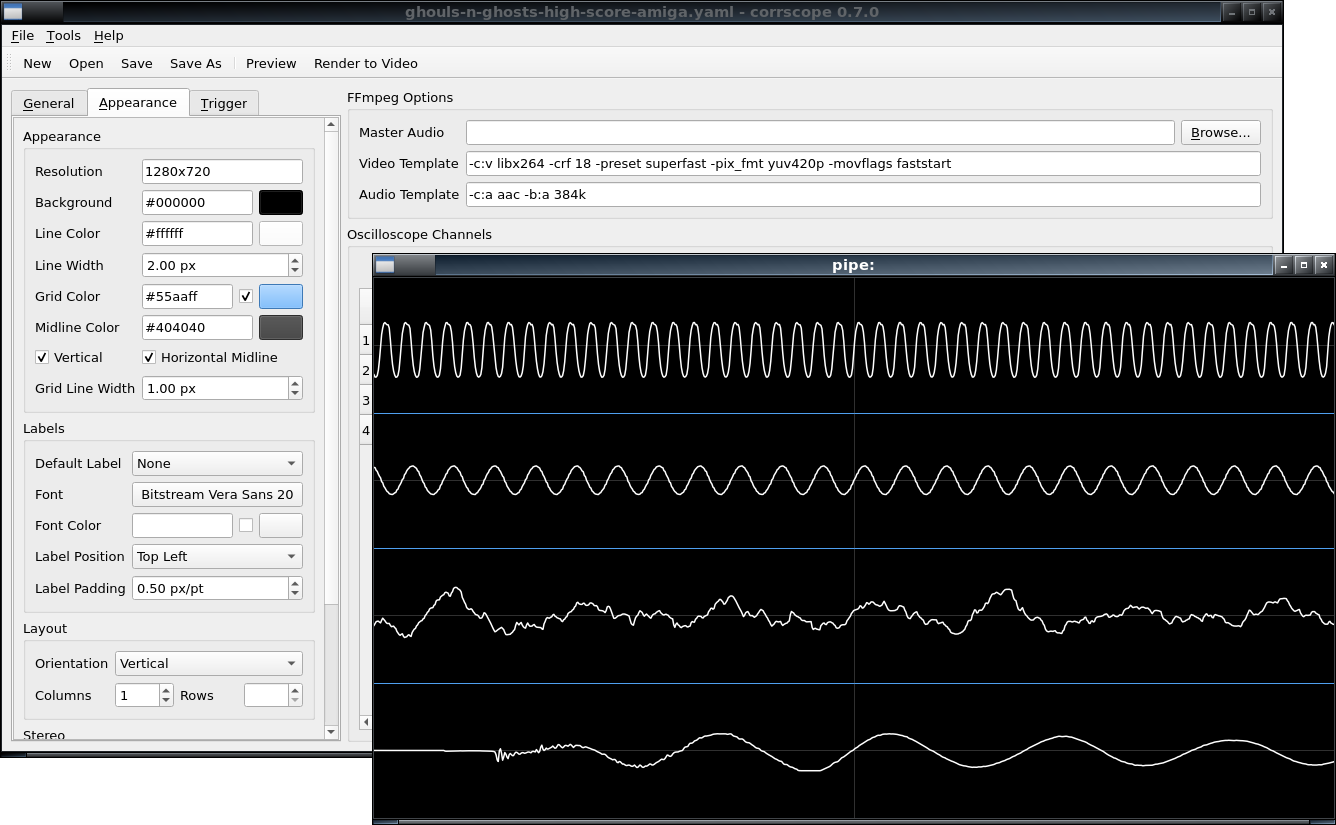
- Global options: Left pane
- Trigger options: Top-right pane
- Per-channel options: Bottom-right table
Start by adding channels to be visualized. Look above the bottom-right table, click the “Add…” button, then select some .wav files.
- 24-bit WAV files are not supported, and must be converted to 16-bit integer or 32-bit integer/float WAV files before playing.
To add audio to play in the background, look at the top-right “FFmpeg Options”, click the Master Audio “Browse…” button, and pick a .wav file.
To make the waves taller, go to the left panel’s General tab and edit Amplification. Afterwards, click the Appearance tab and customize the appearance of the oscilloscope. (Note that colored lines will be discolored and blurred by Youtube’s chroma subsampling.)
Click Preview to launch a live preview of the oscilloscope with audio.
Click Render to render the oscilloscope to video.
Click Save to save the current project configuration to a file. These project files can loaded in corrscope, previewed or rendered from the command line, or shared with corrscope’s author when reporting issues.
- If recently installed fonts are not showing up, you can try clearing the Matplotlib font cache. On Windows, you can view the font cache by opening Explorer and typing
%USERPROFILE%\.matplotlibinto the address bar.
Configuring the Trigger
Unlike other triggering algorithms (which only depend on the current frame’s worth of data), Corrscope uses a correlation trigger, which remembers the waveforms of past frames to help align future frames.
Corrscope’s triggering algorithm is configurable, allowing it to track many types of waves well. However it may be intimidating to newcomers. This will provide several types of waves, along with suggestions for how to tune trigger options.
Triggering options are found on the left panel. Trigger Width is located in the General tab. All other options are found on the Trigger tab. (Per-channel triggering options are found in the table.)
Bass and Treble
For low bass notes, increase global “Trigger Width” or channel-specific “Trigger Width ×”. For treble notes, longer trigger width should not negatively affect triggering; if it does, let me know so I can fix corrscope!
Managing DC Offsets
“DC Removal Rate” (mean_responsiveness) affects how corrscope removes DC from data used for triggering. Setting it to 0.0 makes corrscope not subtract DC from the waveform. Setting it to 0.5 makes corrscope estimate the DC offset by averaging the current frame’s average amplitude and the previous frame’s estimate, and subtract the estimate from the data. Setting it to 1.0 makes corrscope estimate the DC offset independently on each frame, and subtract the estimate from the data.
In most cases, you can leave “DC Removal Rate” to 0. If this causes problems in practice, let me know so I can update these guidelines!
For waves with high DC offsets, if you want to trigger based on the current DC offset of the wave, set the global or track-specific “DC Removal Rate” to 0.5-1. If you want to trigger based on the zero-amplitude baseline, set it to 0.
For NES triangle waves where you want to trigger based on the zero-amplitude baseline exactly, set “DC Removal Rate” to 0.
Sampled Trumpets and Trigger Direction (screenshot from Tales of Phantasia)
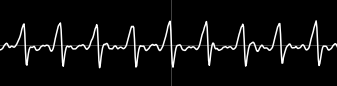
Sampled trumpets generally consist of a sharp falling edge, followed by gibberish with one or more rising edges.
- Set “Trigger Direction” to “Falling (-1)”, which will track the falling edge well. (Using a rising-edge trigger will result in poor results, since the gibberish will vary between notes, especially for SNES SPC music using the echo functionality.)
Complex Waves and Trigger Direction (screenshot from Midori Mizuno - Sinkhole)
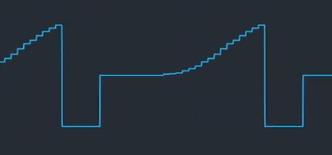
The best settings for triggering complex waves varies on a case-by-case basis. This particular waveform has a clear falling edge from positive to negative, but no clear rising edge from negative to positive.
- Set “Trigger Direction” to “Falling (-1)”. This will produce good results. You can also decrease “Buffer Strength” to 0 to prevent possible triggering errors upon new notes.
- If you want rising-edge triggering, you could try setting “Trigger Direction” to “Rising (+1)”, experimenting with “DC Removal Rate” and “Slope Width”, and possibly decreasing “Buffer Strength” to 0. This may or may not work well.
NES Triangle Waves
NES triangle waves are stair-stepped. If “DC Removal Rate” is nonzero, on every frame, corrscope looks at a different portion of the triangle wave, computes the average value (DC offset), and subtracts it from all samples. Unfortunately since the exact amount of DC (positive or negative) fluctuates between frames, corrscope will shift the wave vertically by different amounts, causing it to jump between different rising edges.
- Use any “Trigger Direction” you prefer. Rising and Falling both work equally well.
- Set “DC Removal Rate” to 0. This causes corrscope to look at the actual zero crossings instead of subtracting an estimated DC offset on each frame.
- Alternatively, set “Sign Amplification” to 1 or so. This causes corrscope to preprocess the waveform before DC is removed, and add 0.5(peak-to-peak amplitude) to positive samples and subtract 0.5(peak-to-peak amplitude) from negative samples. The resulting steep edges will remain as zero crossings, even after DC is filtered out.
- Both techniques can be combined if you want.
NES triangle waves have 15 rising/falling edges. The NES high-pass removes DC and low frequencies, causing waveforms to decay towards y=0. As a result, “which edge crosses y=0” changes with pitch.
- Reduce “Buffer Strength” to 0. Corrscope’s buffer needs to be disabled, to prevent it from remembering “which edge used to cross y=0”.
FDS FM Waves
FDS FM changes the width of waves, but not their height. The NES high-pass removes DC and low frequencies, continually offsetting waveforms to move the current input amplitude towards y=0. If FDS waves contain anything other than pulse/saw, “which part of the wave crosses y=0” may change with FM and pitch.
- Experiment with “Trigger Direction”, “Slope Width”, and “Edge Strength” vs. “Buffer Strength”.
- If you have multiple steep rising/falling edges, it may be impossible to reliably pick the same edge every time. See the next section for more ideas.
Yamaha FM and SNES/sampled Waves
Newer consoles have complex waveforms which evolve over time. If a waveform evolves and has multiple rising/falling edges, corrscope and other oscilloscope programs will frequently struggle.
- Experiment with “Trigger Direction”, “Slope Width”, and “Edge Strength” vs. “Buffer Strength”.
Increasing “Edge Strength” and decreasing “Buffer Strength” tracks new notes better, but causes corrscope to jump around more within notes. Decreasing “Edge Strength” tracks sustained evolving notes better, but causes corrscope to pick poor starting points on new notes.
- Reduce “Edge Strength” to track sustained notes better, then increase “Reset Below Match” to 0.5-1.0 to reset the buffer upon new notes (when the waveform doesn’t match the buffer well).
- Tuning “Reset Below Match” is difficult; set it too low and corrscope won’t reset the buffer on new notes, set it too high and it will reset mid-note.
- Try boosting “Buffer Responsiveness” to 1.0 or so; this may allow increasing “Reset Below Match” further without resetting during sustained notes.
- To better track evolving notes without jumping between positions, you can enable Post Triggering and experiment with the radius.
Technical Explanation
High-level Overview
Corrscope saves a history buffer of size Trigger Width between frames. On each frame, we fetch input data of size 1.5 * Trigger Width, then sweep the history buffer (size Trigger Width) within the input data, picking the optimal alignment (resulting in a triggering range of 0.5 * Trigger Width). As a result, to properly trigger a wave of frequency <50 Hz (period >20 ms), you need a Trigger Width of >40 ms (not 20 ms)!
On each frame, corrscope’s trigger locates candidate trigger points, by scanning across input data near the currently playing point in the audio, and looking for points near rising edges with good alignment. For each incoming sample, corrscope computes Edge Strength * “total waveform to the right” (maximized at each rising zero-crossing) + Buffer Strength * “similarity with buffer” (measuring alignment with previous frame). Then we keep points lying at a local maximum. If Buffer Strength is set to 0, this locate all rising edges (zero-crossings).
For each candidate trigger point (a local maximum of the zero-crossing/buffer score), we compute the quality by summing Edge Strength * “slope around the point” + Buffer Strength * “similarity with buffer” (measuring alignment with previous frame). Then we use the candidate trigger point with the highest slope/buffer score.
Options
All tabs are located in the left pane.
- Global
Trigger Width(combined with per-channel “Trigger Width ×”)DC Removal Rate(mean_responsiveness)
- Trigger, Edge Triggering
Trigger DirectionEdge StrengthSlope Width
- Trigger, Wave Alignment
Buffer StrengthBuffer ResponsivenessReset Below MatchPitch Tracking
- Trigger, Post Triggering
- Post Trigger
Post Trigger Radius
Variables Remembered
buffer: array of samples, containingTrigger Width(around 40 milliseconds) recent “trigger outputs”. Starts out as all zeros.mean: real number, estimated from recent “trigger inputs”. Starts out at 0.slope_finder: recomputed whenever the wave frequency/periodchanges.
Obtaining Data (each frame)
On each frame, corrscope fetches (from the channel) a buffer of mono data with length 1.5 times Trigger Width. data[0] corresponds to the current time in the channel, minus 1 frame or half of data’s width (whichever one is less).
- If
Edge Directionis “Falling (-1)”, then both the main and post trigger will receive negated data from the wave, causing both to search for falling edges (instead of rising edges).
Sign Amplification
Some waves do not have clear edges. For example, triangle waves do not have clear rising edges (leading to suboptimal triggering), and NES triangles have 15 small rising edges, causing corrscope to jump between them.
If Sign Amplification is set to nonzero strength, corrscope computes peak = max(abs(data)). It adds peak * strength to positive parts of data, subtracts peak * strength from negative parts of data, and heavily amplifies parts of the wave near zero. This helps the correlation trigger locate zero-crossings exactly, and is necessary if you enable DC removal (which offsets the wave by a variable distance vertically).
Mean and Period
To remove DC offset from the wave, corrscope optionally calculates the mean of input data, smooths it over time, and subtracts this averaged mean from data. For more details on this smoothing process (DC Removal Rate), see “Managing DC Offsets” above.
Corrscope then estimates the fundamental period of the waveform, using autocorrelation.
(optional) Pitch Tracking
If Pitch Tracking is enabled:
If period changes significantly:
- Cross-correlate the log-frequency spectrum of
datawithbuffer. - Rescale
bufferuntil its pitch matchesdata.
Pitch Tracking may get confused when data moves from 1 note to another over the course of multiple frames. If the right half of buffer changes to a new note while the left half is still latched onto the old note, the next frame will latch onto the mistriggered right half of the buffer. To prevent issues, you should consider reducing Buffer Responsiveness (so buffer will not “learn” the wrong pitch, and instead be rescaled to align with the new note).
(optional) Resetting buffer on new notes
If Reset Below Match is greater than zero:
- If the current wave’s estimated similarity to the previous buffer is below
Reset Below Matchtimes the buffer’s similarity to itself, the buffer is cleared. - Setting
Reset Below Matchto any nonzero value clears the buffer on silent sections of the song. (On near-silent sections, Corrscope instead resets and recreates the buffer each frame. This is subject to change.)
When tuned properly (which is often difficult), this prevents notes from influencing each other, without interfering with triggering during a note.
Correlation Triggering (uses buffer)
On each frame, we use a combination of edge detection and history comparison (each optional) to pick a triggering point within a possible range of 0.5 * Trigger Width. For details, see “High-level Overview” above.
Edge Strengthcontrols how strongly corrscope prioritizes searching for rising edges, and picking strong edges with high slope.Slope Widthcontrols how much data around each candidate trigger point is used to evaluate edge strength (or slope).
Buffer Strengthcontrols how strongly corrscope prioritizes similarity withbuffer(and searches for waves which line up with previous on-screen content).
(Optional) Post Triggering
If post triggering is enabled:
- We recalculate the
post meanof data around our newpositionvalue. Ifpositionis a good trigger position (and there are no nearby discontinuities like note changes), thenpost meanshould be stable and not jitter.- TODO don’t force mean removal for post triggering
- TODO decouple variables storing trigger and post mean
- The post trigger is called with
positionand returns a newposition, which overwrites the original variable.
Zero Crossing Trigger
Setting Post Trigger to “Zero Crossing Trigger” causes corrscope to “slide” towards edges. The maximum distance per frame is determined by GUI Post Trigger Radius (in samples).
- Grab some new data around
position. Subtractpost meanfrom the new data. - If the data is positive, search left for a rising edge. If the data is negative, search right for a rising edge.
- If no edge is found within
Post Trigger Radiussamples, returnposition±Post Trigger Radius.
Updating Buffer
- Corrscope fetches [from the channel] a buffer of mono
triggered data, centered atposition triggered datais multiplied by a Gaussian window with width 0.5 × period- Corrscope updates
buffer=buffer+Buffer Responsiveness× (triggered data-buffer).
Video Encoding
Corrscope uses FFmpeg to encode videos. All video encoding settings (both picking an encoder and options) are configured in Corrscope’s “Video Template” textbox, which is passed to FFmpeg. By default, it tells FFmpeg to use the x264 video encoder (producing H.264 videos). Tuning video encoders like x264 is a complex task, but this is a brief summary of the default settings:
Videos are first converted from RGB pixel values to YUV (brightness and color).
-pix_fmt yuv420penables chroma subsampling of the YUV frames, which halves the horizontal and vertical resolution of the color channels (blurring color information) before compressing the video. For example, a 1280x720 video only has 640x360 of color information!- This improves compatibility with players like web browsers, smartphones, and Windows 10’s Videos app, but degrades the quality of colored lines.
- Removing this argument produces a better-looking video (with a relatively small file size increase), but the quality boost is lost when uploading to YouTube (which transcodes the video to yuv420p).
Afterwards, the video is sent to the video encoder, which has its own arguments:
-c:v libx264picks libx264 as the video encoder.-crf 18determines the quality of the compressed video. Higher values discard more information, producing smaller but lower-quality files.-preset superfastspeeds up the rendering process at a given quality level, at the cost of a larger file size.
Avoiding Color Artifacts
Video encoding/compression degrades color more than brightness, especially fine color detail. As a result, thin colored lines look desaturated, fuzzy, or discolored. (Thin lines generally arise when rendering at a low resolution, or when YouTube takes a high-resolution video with thick lines and reencodes lower-resolution streams with thinner lines.) To avoid this loss of quality, corrscope defaults to white lines on a black background.
Loss of color information is especially damaging with “Color Lines By Pitch” enabled. At the default settings (720p, 1.5 pixel thick lines), the vibrant line colors seen in the preview lose saturation when rendered, and turn into grayish messes when uploaded to YouTube (blues and purples lose the most color).
To render colored lines while minimizing quality loss, render at a higher resolution (slower) with thicker lines. This will improve color fidelity for people who watch the resulting videos above 720p.
I do not have experience with other encoders (like x265, VP8, VP9, or AV1), but all codecs supported by browsers lose color detail to chroma subsampling, and I think most lose color detail to lossy compression as well. AV1 should preserve colored lines better because it has chroma-from-luma, but AV1 encoders are slow, and many people watching YouTube receive a transcoded h.264 feed instead, which drops color detail anyway.
Audio Encoding
corrscope defaults to rendering to .mp4 files, which support a limited set of audio codecs. MP3 is a “good enough” audio codec. AAC is better in theory, but ffmpeg’s AAC encoder (which corrscope uses by default, -c:a aac) is bad. Opus is currently the best audio codec available, and FFmpeg has added support for Opus in MP4 files, so we use libopus by default. The default -b:a 256k VBR should be overkill for audio quality.
Missing Fonts
If you install a new font and it does not work in corrscope, you may need to clear the Matplotlib font cache. In Corrscope, click on menu Tools → Reload Font List, and check if the font works now. If not, your font may be an unsupported (eg. bitmap) font.
To manually reload the font list, on Windows you can delete C:\Users\(whatever_your_username_is)\.matplotlib.